Overview: Creating Patent Drawings Step by Step
Creating patent drawings that the USPTO will accept requires more than just artistic skill. It requires understanding technical standards, patent law, and the specific purpose of your drawings. Whether you're filing a utility patent, design patent, or provisional application, the process follows a logical sequence from concept to submission.
This guide walks you through the entire process: understanding patent types, identifying required views, gathering source materials, choosing a creation method, executing the drawings, adding reference numerals, reviewing compliance, and submitting with your application.
Why Getting This Right Matters
Patent examiners cite drawing deficiencies in 20–30% of initial Office Actions. Common issues like incorrect margins, missing reference numerals, poor line quality, and inadequate views create delays and additional costs. Following this guide helps reduce the issues that trigger drawing objections.
Step 1: Understand Your Patent Type
The first decision is critical: are you filing a utility patent or a design patent? This determines the purpose and format of your drawings.
Utility Patents
Utility patents protect how something works: the functional innovation. Drawings must show the structure, internal mechanisms, components, and relationships. They answer the question: "How does this invention function?" You'll typically include multiple technical views with reference numerals labeling every claimed component.
Design Patents
Design patents protect how something looks: the ornamental appearance. Drawings must show the visual form, surface contours, and shape from multiple angles. No reference numerals. Instead, surface shading creates a photorealistic 3D appearance. The focus is aesthetic, not functional.
Provisional Patents
Provisional applications (filed to establish priority date) require less formal drawings but must still be technically accurate. Many inventors include rough sketches or CAD screenshots in provisional applications, then invest in formal drawings for the utility patent conversion one year later.
Common Mistake: Wrong Patent Type
Submitting design patent drawings for a utility patent application (or vice versa) triggers immediate rejection. A design patent drawing without reference numerals looks completely wrong in a utility patent. Similarly, utility patent drawings with extensive technical labels confuse the visual presentation in a design patent. Confirm your patent type before starting drawing creation.
Step 2: Identify Required Views
Different inventions require different views to fully illustrate structure and function. This step determines what views you'll create.
Common View Types
Perspective View (FIG. 1): A 3D representation showing overall form. Usually the first figure. Gives the examiner immediate context for your invention's appearance and relative proportions.
Orthographic Views (FIG. 2-5): Standard engineering views: front, back, top, bottom, left side, right side. Each reveals details hidden in perspective. Required when any view omits important features.
Cross-Sectional Views (FIG. 6+): "Cut-away" views showing internal structure. Essential for inventions with internal mechanisms, cavities, layers, or assembled components. Indicated by a sectioning plane line on one view and labeled details on the corresponding cross-section.
Exploded Views: Show how components fit together by separating them along assembly or movement axes. Critical for mechanical inventions with multiple parts. Dashed lines connect related parts, or arrows show assembly direction.
Detail Views: Enlarged views of small or intricate features. A circled region in one view is expanded in a separate figure to show fine detail that would be illegible at standard scale. Labeled as "Detail A" or similar.
Flowcharts & Block Diagrams: For software, algorithms, and process patents. Show sequence, decision points, data flow, and functional relationships. Each box is labeled with a reference numeral.
How to Decide Which Views to Include
- Review your claims: Every component referenced in your patent claims must appear in a drawing with a visible reference numeral.
- Identify all functional features: If a feature is mentioned in your specification or claims, a drawing view that shows it is expected.
- Consider assembly and operation: If your invention has parts that move, assemble, or interact, include views that show these relationships.
- Check for hidden details: If a perspective view hides important structure, add an orthographic or cross-sectional view to reveal it.
- Use detail views for complexity: Small or intricate features need enlargement to meet legibility requirements.
Rule of Thumb
Include enough views that every claimed component is visible and every functional relationship is illustrated. A typical utility patent has 3–8 drawing sheets. Complex mechanical devices may need 10–20 sheets. Software patents typically need 4–8 flowchart sheets. The guiding principle is clarity and completeness, not economy.
Step 3: Gather Source Materials
Before you start drawing, collect the raw materials that will inform your patent drawings. The format and quality of these source materials influence which creation method you'll use.
Types of Source Materials
Hand Sketches: Hand-drawn sketches from your lab notebook or design process. Rough but convey the overall concept. Useful for rapid iteration and idea validation. Not suitable for final patent drawings but excellent input for AI-powered generation.
Photographs of Prototypes: High-quality photos of a working prototype or physical model. Capture real-world appearance, proportions, and assembly relationships. Excellent reference for perspective and detail views. Some tools convert photos to formal drawings.
CAD Files (2D or 3D): Computer-aided design files from software like AutoCAD, Fusion 360, SolidWorks, or Inventor. The most precise format. 3D CAD files can be rendered from multiple angles to generate orthographic and perspective views automatically.
3D Models and Digital Renders: 3D mesh files, renders, or screenshots. Useful for complex mechanical or product designs. Modern AI tools can convert high-quality 3D renders into filing-ready patent drawings formatted for USPTO requirements.
Specification Document: Your patent specification (or draft specification) lists every component and describes how the invention functions. This is your authoritative reference for what views and labels are needed.
Best Practices for Source Materials
- High resolution: For photographs and digital images, use high-resolution files (at least 2000x2000 pixels for complex devices).
- Multiple angles: Provide source materials from different perspectives to enable creation of orthographic and cross-sectional views.
- Dimensional accuracy: If using CAD, ensure dimensions are accurate and scale is correct.
- Labeling in source: Optional but helpful: label components in source sketches or CAD renders using temporary reference numbers. These guide the formal labeling step.
- Specification alignment: Cross-reference your source materials against your patent specification to ensure all described features are covered.
Step 4: Choose Your Creation Tool
Four primary methods exist for creating patent drawings. Each has distinct advantages, tradeoffs, and suitable use cases. Your choice depends on your budget, timeline, technical skill, and resource constraints.
| Method | Cost | Timeline | Learning Curve | Best For |
|---|---|---|---|---|
| Hiring an Illustrator | $150–600+ per drawing set | 3–10 business days | N/A (outsourced) | High-stakes cases, complex inventions, traditional approach |
| CAD Software (DIY) | $200–$5,000+ annual license | 2–30+ hours per invention | Very steep | Technical inventors with CAD experience |
| Patent Drawing Software | $300–2,000+ annual | 1–8 hours per invention | Moderate | Patent professionals managing multiple filings |
| AI Patent Drawing Tools | $50–300 per drawing set | 5–30 minutes | None | Speed, cost efficiency, bulk filings |
Option A: Hiring a Professional Patent Illustrator
This is the traditional approach. Patent illustrators are specialists trained in USPTO formatting rules, technical illustration, and the visual language of patents. They charge $30–75 per drawing sheet (or $150–600 for a complete set). Turnaround is 3–10 business days.
Advantages: High-quality output, zero learning curve, handles all formatting automatically, can handle complex technical details, good for one-off filings.
Disadvantages: Expensive, slow turnaround (problematic for provisional applications), revision cycles can delay submission, hard to find quality illustrators in some fields.
Option B: CAD Software (AutoCAD, SolidWorks, Visio)
DIY approach using professional-grade CAD or drawing software. These tools offer precision and flexibility but require substantial technical skill and time investment.
AutoCAD: Industry standard for technical drawing. Precise, feature-rich, but steep learning curve. $2,000+ annual subscription.
SolidWorks: 3D CAD software. Excellent for mechanical inventions. Can render 3D models from multiple angles to create orthographic views. Requires training. $7,000+ annually.
Visio: Flowchart and block diagram specialist. Good for software and process patents. More accessible than AutoCAD. $70–150 annually.
Advantages: Full control, precise to exact specifications, one-time license costs, reusable across multiple inventions.
Disadvantages: Extremely steep learning curve, time-consuming (10–30+ hours per invention), requires expertise in USPTO formatting, ongoing effort to ensure compliance.
Option C: Specialized Patent Drawing Software
Software designed specifically for patent drawings. Examples include PatentOptimizer, PatentMaker, and similar platforms. These bridge the gap between raw CAD and outsourced illustration, easier than general CAD but more specialized than generic tools.
Advantages: USPTO formatting rules built-in, faster than general CAD, moderate learning curve, suitable for patent professionals managing many filings.
Disadvantages: Moderate cost ($300–2,000 annually), still requires training, less flexible for highly complex or novel inventions.
Option D: AI-Powered Patent Drawing Generation
Modern AI tools (like PatentDrawingAI) convert sketches, photos, or CAD renders exported as images into filing-ready patent drawings in about 1-3 minutes per figure. The workflow helps with formatting, line quality, reference numerals, and view generation.
Advantages: Fast turnaround, low cost per figure, no CAD learning curve, and less manual formatting work. It can be useful for bulk filings and tight deadlines when the source material is clear.
Disadvantages: Requires good source material input, may need human refinement for highly novel inventions, less control over artistic interpretation.
Speed vs. Control Trade-Off
Hiring an illustrator gives maximum control but takes 3–10 days. DIY CAD takes weeks but costs only a software license. Patent software is faster and cheaper than CAD. AI is fastest and cheapest but requires decent source material. Choose based on your priority: timeline, budget, control, and complexity.
Step 5: Execute the Drawings
Now you create the actual drawings. The exact process depends on which method you chose in Step 4.
If You Hired an Illustrator
Provide your source materials (sketches, photos, CAD files, specification) and a clear description of required views and components. Establish deadlines and revision limits upfront. Most illustrators offer 1–2 rounds of revisions before charging additional fees. Review deliverables carefully against your specification to catch errors early.
If You're Using CAD or Patent Software
Import or recreate your design in the software. Generate each required view (perspective, front, back, top, bottom, left, right, cross-sections, exploded, details) from your model. Ensure proper scale, line weight, and positioning on each page.
If You're Using AI Patent Drawing Tools
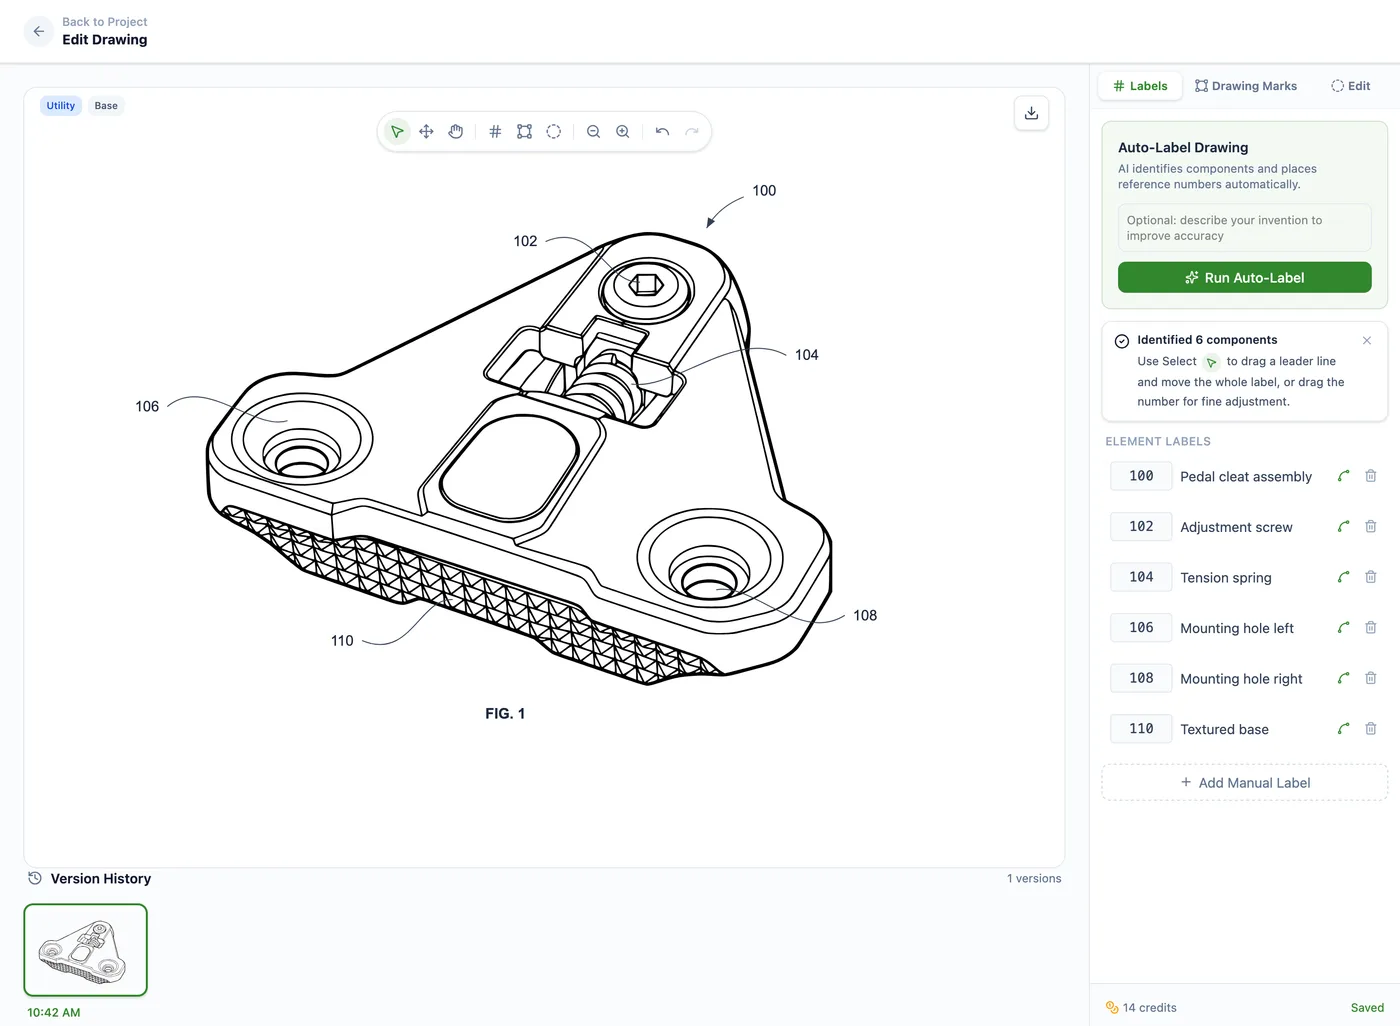
Upload your source material (sketch, photo, CAD render exported as an image, or 3D model render). Describe your invention briefly (name, invention type, key components, how it works). Specify required views (perspective, orthographic, cross-section, exploded, etc.). PatentDrawingAI creates filing-ready line drawings you can review, label, refine, and export in the required format.
PatentDrawingAI's editor lets you type natural-language instructions, for example "add more thread detail to the screw," "remove the extra side extrusion," or "lighten the top surface," and apply an AI edit in about 1-3 minutes. Visual dials for line boldness, shading, cleanup level, and detail retention give you fine-grained control without needing vector editing software. Each AI edit costs 1 credit.
PatentDrawingAI drawing editor
General Execution Principles
- Scale and proportions: Maintain accurate relative proportions between components. Avoid distortion.
- Perspective consistency: In perspective views, use consistent vanishing points and avoid skewed or distorted angles.
- Cross-section clarity: When showing internal structure, use clean, consistent hatching patterns to indicate cross-sections and different materials.
- Exploded view assembly logic: Components should separate along natural axes of assembly. Use dashed lines or arrows to show relationships.
- Detail view framing: Magnify intricate features enough for legibility (details should be readable at 2/3 reduction).
Step 6: Add Reference Numerals and Labels
Reference numerals are one of the most critical elements of patent drawings. Every component mentioned in your patent claims must have a visible reference numeral in the drawings.
Reference Numeral Rules
- Every claimed element must be labeled: If a component appears in your patent claims, it must have a reference numeral in the drawings.
- Consistent numbering: Use the same numeral for the same component across all views.
- Lead lines: Use thin lines connecting the numeral to the component. Lead lines should not cross other elements or numerals.
- Size: Numerals must be at least 0.32 cm (1/8 inch) high, large enough to remain legible at 2/3 reduction.
- Font: Use a clean, sans-serif font. Typical size is 10–14 points depending on drawing scale.
- Placement: Position numerals outside the drawing outline when possible. Use lead lines to point to components inside the silhouette.
- No abbreviations: Write out "Figure 1" or "FIG. 1"; don't use "Fig" or "F1."
Creating a Reference Legend
Develop a numbered list of all components and their descriptions. For example:
12: Front panel
14: Display screen
16: Control button
18: Rear cover
[etc.]
This legend becomes part of your specification (in the "Description of Elements" section) and ensures your drawings and written description use consistent numbering.
Critical: Reference Numerals Must Match Your Claims
If your claims say "the apparatus comprises a housing (10) and a control mechanism (12)," then every drawing must show elements 10 and 12 with visible reference numerals. Mismatches between claims and drawings trigger rejection notices and delays. Use your patent specification as the authoritative reference for what gets numbered.
Step 7: Review Against 37 CFR 1.84 Compliance Checklist
Before submission, verify that your drawings comply with USPTO rules codified in 37 CFR 1.84. Here's the compliance checklist:
| Requirement | Standard | Check |
|---|---|---|
| Paper Size | 8.5" × 11" (US) or A4 (21 cm × 29.7 cm) | Correct dimensions in all files? |
| Margins | Top: 2.5 cm, Left: 2.5 cm, Right: 1.5 cm, Bottom: 1.0 cm | All margins measured and correct? |
| Figure Labels | "FIG. 1", "FIG. 2" (not "Fig", "F1", etc.) | All views labeled correctly? |
| Reference Numerals | At least 0.32 cm high; lead lines connect to components | All claimed elements numbered? Numerals legible at 2/3 reduction? |
| Line Quality | Black ink, uniform thickness, sharp and clear. No faint or broken lines. | All lines clean and dark? No thin or fading lines? |
| Shading/Hatching | No gray shading (use cross-hatching, stippling, or spaced lines). Different patterns for cross-sections and materials. | No solid gray areas? Hatching patterns consistent and clear? |
| Text in Drawings | Minimal. Only reference numerals, figure labels, and essential legends. No descriptive matter in drawing field. | No unnecessary text? No labels outside standard format? |
| Scale | Drawings large enough for legibility at 2/3 reduction | Can all text, numerals, and details be read when reduced to 2/3 size? |
| Numbering | Sheets numbered consecutively (1/5, 2/5, etc.). Figures numbered across all sheets. | Sheet counts correct? Figure numbers sequential? |
| Color | Black and white only (color requires petition and fee) | No color in drawings? All black ink? |
| File Format | PDF or TIFF (300 DPI minimum). Not JPEG, DOCX, or image formats. | Files in correct format? Resolution adequate? |
Detailed Compliance Steps
- Print test: Print all pages and measure margins with a ruler. Even small deviations trigger rejection.
- Reduction test: Make a copy at 66% (2/3 reduction). All text and numerals must remain legible.
- Legibility check: Review every line, numeral, and text character under magnification. Thin or faint lines will be rejected.
- Completeness audit: Cross-reference your drawings against your patent specification and claims. Every mentioned component must be numbered.
- Cross-section verification: If you use hatching for cross-sections, verify that different materials or sections use distinct hatching patterns.
- Lead line check: Ensure all reference numerals have clear lead lines connecting them to components, and that lines don't cross other elements.
- Figure label consistency: Verify that all figures are labeled "FIG. 1", "FIG. 2", etc. (with period, with space).
- Page layout: If you have multiple sheets, verify that sheet counts are accurate (e.g., if you have 5 sheets, they should be labeled "1/5", "2/5", "3/5", "4/5", "5/5").
Why This Matters
Patent examiners conduct a formalities review before substantive examination. Drawing errors at this stage result in an Office Action requiring correction. You'll have 2–3 months to fix and resubmit, during which prosecution is suspended. This delay costs time and may affect priority claims. Following this checklist avoids that entirely.
Step 8: Submit With Your Patent Application
Once your drawings are complete and compliance-checked, you're ready to include them in your patent application.
File Format and Organization
Format: Submit drawings as PDF files (preferred) or TIFF files at 300 DPI minimum. Do not use JPEG, Word documents, or image formats.
File naming: Use clear naming conventions. For example: "MyInvention_PatentDrawings_Sheet1.pdf", "MyInvention_PatentDrawings_Sheet2.pdf", etc.
File size: Keep individual drawing files under 5 MB. Larger files may cause upload issues with patent office systems.
If Filing in the USPTO EFS System
- Create an account at patents.uspto.gov (if you don't have one).
- Start a new application or upload drawings to an existing application.
- Select "Drawings" as the document type.
- Upload each drawing sheet PDF in sequence.
- The system will automatically detect and organize the sheets.
- Review and confirm before final submission.
If Using a Patent Attorney or Agent
Provide your drawing files to your attorney in PDF format, clearly labeled by sheet number. Confirm that your attorney will verify compliance with 37 CFR 1.84 before filing.
If Filing Internationally
Different countries have slightly different requirements. Key considerations:
- Paper size: A4 is standard internationally. Some offices require metric margins.
- Language: Drawings typically don't need translation, but labels or legends may need to match the filing language.
- PCT filings: Use PCT Standard ST.10.4 for Patent Cooperation Treaty filings.
- European Patents (EPO): Separate more detailed rules apply under Rule 11 EPC.
Pro Tip: Keep Copies
Keep a complete copy of all drawing files, source materials (sketches, CAD files, photos), and your reference numeral legend in a secure location. If the patent office requests modifications or clarifications, you'll need these originals to make quick revisions.
Tools Comparison: Which Method is Right for You?
Scenario 1: Single Patent Filing, Limited Budget
Best choice: AI Patent Drawing Tool or Budget Illustrator
If you have a working prototype, CAD render exported as an image, or good sketches, PatentDrawingAI can create filing-ready figures in about 1-3 minutes per figure. This is faster and cheaper than hiring an illustrator ($150–600) and doesn't require software subscriptions.
Scenario 2: Filing 5+ Patents Per Year
Best choice: Patent Drawing Software or AI Tool (bulk licensing)
If you're filing multiple patents annually, the per-drawing cost of dedicated patent software or bulk AI licensing becomes economical. You'll recover software costs within 3–5 filings.
Scenario 3: Complex Mechanical Invention with Unique Components
Best choice: Professional Patent Illustrator or CAD Software (if you have CAD skill)
Highly novel or complex inventions may benefit from an illustrator's expertise in visualizing complex spatial relationships. If you have CAD experience, SolidWorks or similar 3D software gives you full control.
Scenario 4: Software, Algorithm, or Process Patent
Best choice: AI Tool, Visio, or Patent Software
Software patents require flowcharts and block diagrams, not physical illustrations. Visio is excellent for this (accessible learning curve, $70/year). AI tools can also generate flowchart structures from text descriptions. Illustrators are overkill.
Scenario 5: High-Value Patent with Large Budget
Best choice: Professional Patent Illustrator + CAD Verification
For a breakthrough invention with significant commercial value, a professional illustrator ($300–600) is a small cost. They'll handle all details, coordinate with your attorney, and ensure drawings strengthen your patent's enforceability.
Scenario 6: Tight Deadline (Provisional Application Due Tomorrow)
Best choice: AI Patent Drawing Tool
Provisional applications have no formal drawing requirements; they need to show your invention clearly enough to support the filing. PatentDrawingAI can create filing-ready figures in about 1-3 minutes per figure. You can refine those figures when you file the utility patent one year later.
| Tool Type | Cost per Filing | Speed | Best For | Learning Curve |
|---|---|---|---|---|
| Professional Illustrator | $150–600 | 3–10 days | Complex, high-value, one-off patents | None (outsourced) |
| AutoCAD / SolidWorks | $2,000–5,000/year license | 1–4 weeks | Technical inventors with CAD experience | Steep |
| Visio (for flowcharts) | $70–150/year | 2–6 hours | Software and process patents | Easy |
| Patent Drawing Software | $300–2,000/year license | 2–12 hours per patent | Patent professionals, bulk filings | Moderate |
| AI Patent Drawing Tool | $50–300 per filing | 15–30 minutes | Speed, cost efficiency, bulk filings, tight deadlines | None |
Pre-Submission Verification Checklist
Use this checklist before submitting your drawings with your patent application:
| Category | Item |
|---|---|
| Formatting | Paper size: 8.5" × 11" or A4 |
| Margins: Top 2.5 cm, Left 2.5 cm, Right 1.5 cm, Bottom 1.0 cm | |
| Line quality: Black, uniform, sharp (no faint or broken lines) | |
| File format: PDF or TIFF at 300 DPI minimum | |
| Views & Coverage | Perspective view (FIG. 1) showing overall form |
| Orthographic views (front, back, top, bottom, sides) as needed | |
| Cross-sectional views showing internal structure (if applicable) | |
| Exploded view or detail views (if components or fine features present) | |
| Reference Numerals | Every component in claims has a reference numeral in drawings |
| Numerals are at least 0.32 cm (1/8 inch) high | |
| Lead lines connect numerals to components clearly | |
| Consistent numbering across all views | |
| Labels & Text | Figure labels correct: "FIG. 1", "FIG. 2", etc. (with period) |
| Sheet numbering correct: "1/5", "2/5", etc. (if multiple sheets) | |
| No descriptive text in drawing field (only reference numerals and labels) | |
| No color (black ink only; color requires petition and fee) | |
| Legible at 2/3 reduction (print at 66% to verify) | |
| Cross-Sections & Shading | Cross-hatching indicates cross-sections (not gray shading) |
| Different hatching patterns for different materials or sections | |
| Shading patterns consistent and clear | |
| Compliance & Documentation | All drawings match written specification and claims |
| Reference numeral legend in specification "Description of Elements" section | |
| Drawings comply with 37 CFR 1.84 (verified independently) |
Quality Gate
Do not submit until every item on this checklist is verified. Common omissions (missing cross-sections, inconsistent reference numerals, poor line quality, incorrect margins) result in formalities rejections that delay prosecution by 2–3 months.
Ready to Create Your Patent Drawings?
Follow this step-by-step process, verify against our compliance checklist, and submit with confidence. For fast, accurate, USPTO-ready drawings, try our AI patent drawing tool.
Generate Patent Drawings in MinutesFrequently Asked Questions
Include as many views as necessary to fully illustrate your invention's structure and function. A simple mechanical device might need 3–5 views. A complex multi-component system might need 8–15 views. The rule is: if a feature is described in your claims or specification, a drawing view showing it is expected. Err on the side of completeness; examiners will not object to having too many clear views.
Photographs are only permitted when the invention cannot be illustrated with ink drawings, for example electrophoresis gels, cell cultures, biological samples, or metallurgical structures. For all other inventions, formal line drawings are required. If you want to use photographs, you must file a petition under 37 CFR 1.84(b) explaining why drawings are inadequate.
Rough hand sketches are sufficient input for creating formal patent drawings. AI tools and professional illustrators can work from hand-drawn sketches. The key is that your sketch accurately shows the invention's structure, components, and how they relate. You can also provide written descriptions and reference materials (photos of similar products, component catalogs, etc.) to guide the drawing creation.
Use the 37 CFR 1.84 compliance checklist in this guide. Verify margins, line quality, reference numeral size, and legibility at 2/3 reduction. Some AI drawing tools handle common formatting checks. If you hire an illustrator, ask whether they'll warrant compliance. Before filing, print all drawings and review them physically; optical inspection often reveals issues that screen review misses.
Provisional applications (filed to establish priority date) have minimal formal drawing requirements; rough sketches can be enough when they make the invention understandable. Utility patent applications (filed one year later) require formal drawings formatted under 37 CFR 1.84. Many inventors submit simple sketches in provisional applications, then invest in formal drawings for the utility patent. This is a standard and accepted practice.
This depends on your method: (1) PatentDrawingAI: about 1–3 minutes per figure; (2) DIY CAD: 4–30+ hours depending on complexity and your skill level; (3) Patent software: 2–12 hours; (4) Professional illustrator: 3–10 business days; (5) Hiring an illustrator: 1–2 weeks from submission to completion. Choose based on your timeline and budget constraints.
No. Utility and design patent drawings serve different purposes and have different visual languages. Utility drawings include reference numerals and focus on functional structure. Design drawings focus on ornamental appearance and use surface shading instead of numerals. You cannot reuse drawings between patent types. However, you can file both a utility and design patent for the same invention using separate, purpose-appropriate drawings.